![]()
![]()

The manual was created with the help of Mike Bradshaw, Greg Stafford,
Joe Hoscheidt, Dave Harvey, Jim
Grantham, and Gary Rosenbaum.
Mike Lesser and Gary Schmidt developed the Steward Observatory CCD guiding
systems and along with Dave Baxter, Bob Peterson, and Jeff Rill also
contributed to this
guide.
Comments, corrections, and suggestions for this manual should be directed to Paul Smith.
If you require help or advice concerning the use of the Kuiper 61" telescope or
facility instrumentation,
please contact the following people (in this order):
After hours phone numbers of these individuals can be found in the 61"
control room.
There MUST be a certified observer present in order to operate the
telescope and instrumentation.
Observers should be especially alert to potential hazards
while at the observatory since
usually there will be no one else at the site during normal operations.
In addition,
help is many minutes away even assuming that you can successfully
call for help in an emergency.
Please remember that moving telescopes and domes are heavy, unforgiving
pieces of machinery that can do serious damage.
The observatory staff does its best to make the site as safe as possible,
but we urge you to report any potential hazards immediately.
Please report any problems encountered with BigGuider
in that night's Trouble Report.
Be as detailed as possible.
It may also help in diagnosing problems if relevant guider CCD images
are saved and identified so that they can be found and examined by
support/technical personnel.
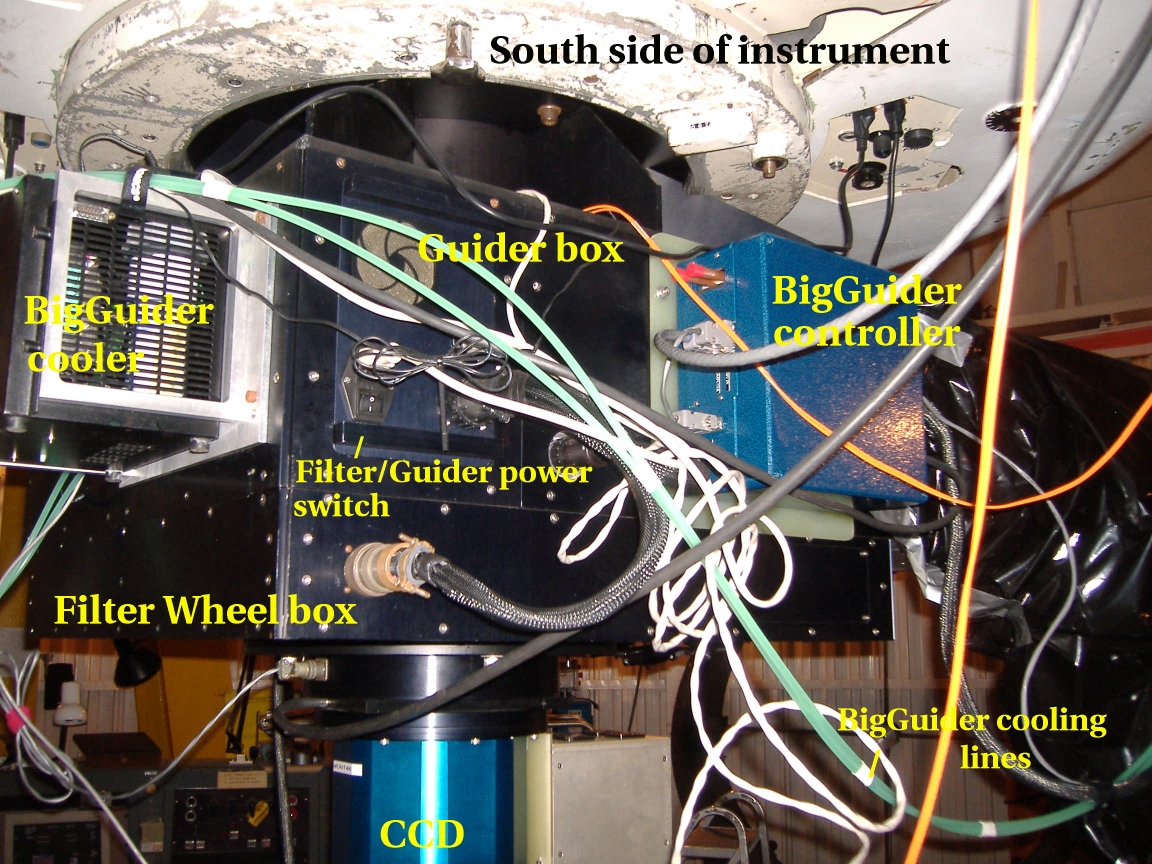
At the south side of the guider box:
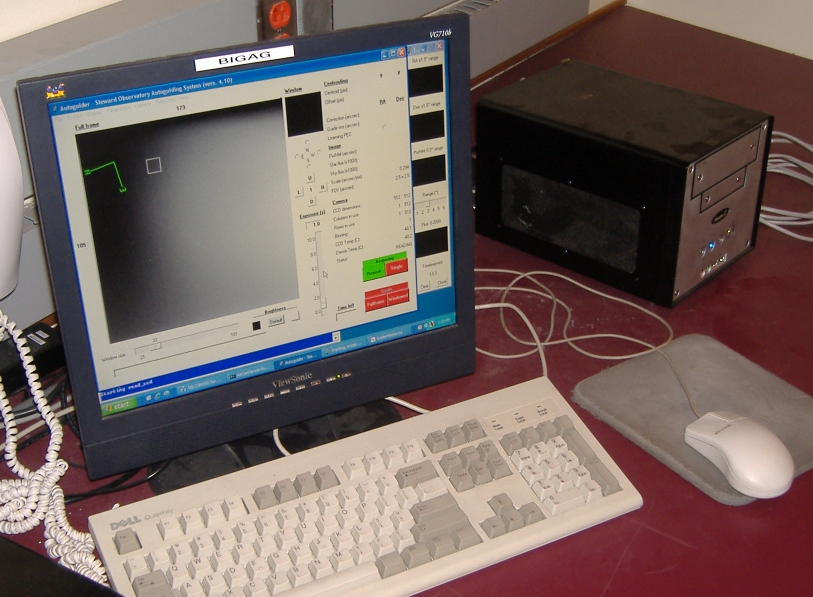
In the control room:
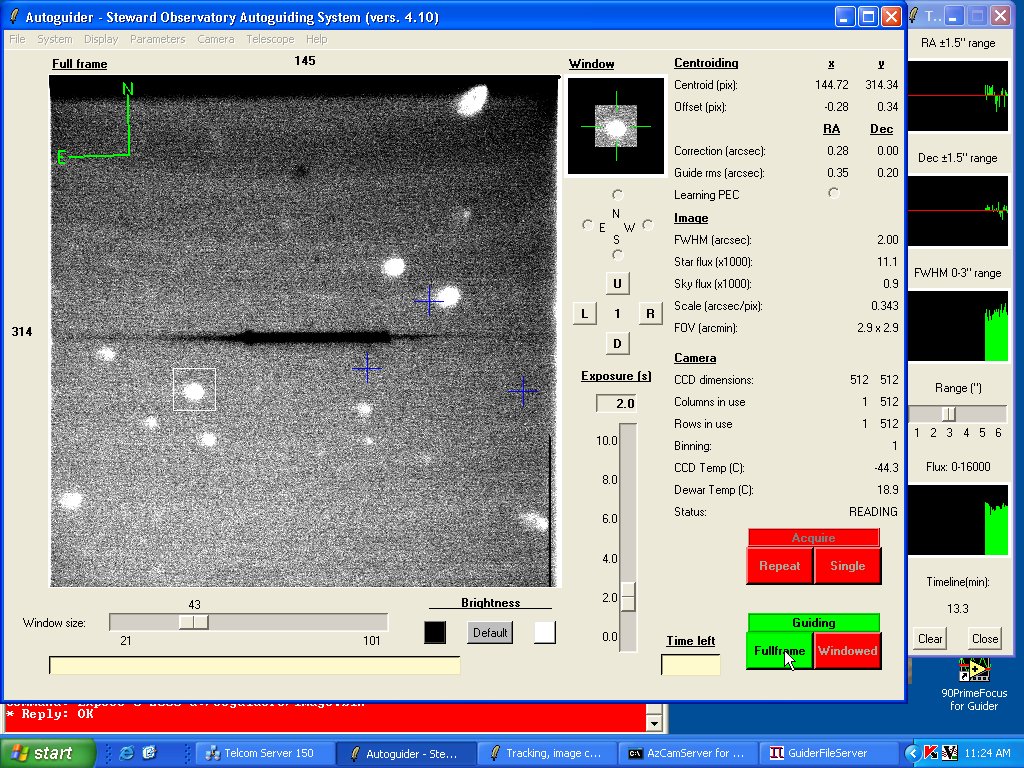
The BigGuider control GUI is pictured below (the large window at the left
of the screenshot) and runs on the bigag PC. Please note that this example screenshot was taken when
the CCD guider was being used with the SPOL spectropolarimeter. There will
be no slit visible in the guider's field of view when the system is used
at the Kuiper Telescope.
The GUI contolling the positioning of the x-y stage that allows the pickoff
mirror to be moved around within the focal plane can be accessed on the kuiper
computer (start the galilserver and filter wheel GUI). The guider probe can be moved to
find a suitable guide star for the science field. Currently, there are
no motion limits or warnings given that alert the observer if the probe
vignettes the science field of view. However, the effect on the Mont4K
field of view has been mapped and observers should avoid the regions outside
of those listed below if an unvignetted science image is desired.
The following x-y stage encoder values avoid vignetting the Mont4K FOV and
excessive vignetting of the guider FOV:
Hitting the "Center" button on the control GUI will place the probe close to
the center of the Mont4K field of view and block most of the field.
"Homing" the stage places it at 0, 0; well out of the Mont4K field of view, but not
within a range where guide stars can be seen.
A move of 500 units in either axis of the guider stage moves the guider
field of view by about 1 arcmin.
It is IMPORTANT to shut down BigGuider in the case of threatening weather.
In the control room:
At the south side of the guider box:
![]()
1. Introduction and Acknowledgments.
This manual is intended to be a convenient reference guide for
observers certified to use the Kuiper telescope and CCD Guider System (BigGuider).
Contact the Steward Observatory (SO) operations office (621-5136;
bpeterson@as.arizona.edu)
or
Paul Smith (621-2779;
psmith@as.arizona.edu)
if you need to be certified.
Emphasis is placed on the safely of observers and the equipment in this
document. A hardcopy of this manual is located in the 61" control room.
In the event of a discrepancy between the Web and hardcopy versions of
this manual, the Web version will take precedence.

Back to the top of the document.![]()
2. Basic Information About BigGuider.
Back to the top
of the document.![]()
3. Observer and Instrument Safety (In case you need assistance...).
IMPORTANT: Please read the
Guidelines
for Observing at Steward Observatory telescopes.
In case of problems with BigGuider:
Back to the top of the document.![]()
4. BigGuider Startup.
Back to the top of the document.![]()
5. Guider Operations and the Control GUI.
Back to the top of the document.![]()
6. Moving the Guider Probe to Find a Guide Star.
Back to the top of the document.![]()
7. Shutting down BigGuider.
Back to the top of the document.![]()
Back to the Mont4K Manual.
Back to the 61" Operations Manual.
![]()
Back to the 61" Home Page.![]()